Use GRASS tools in QGIS
QGIS can run GRASS tools from its Processing Toolbox. You pick a layer, fill in a dialog, and QGIS runs GRASS for you in the background. You get GRASS analysis without leaving QGIS or setting up a GRASS project yourself.
This tutorial shows how to run a GRASS tool on a raster layer, what QGIS does when you click Run, and what to do if QGIS does not find GRASS.
Install QGIS and GRASS
You need both programs:
- QGIS from https://qgis.org/download/. If you are not sure which version to take, the download page recommends the LTR.
- GRASS from https://grass.osgeo.org/download/.
On Windows with the OSGeo4W installer, the GRASS download page says you need the qgis*-grass-plugin packages to get GRASS in QGIS Processing. The QGIS app for macOS from the download page does not include GRASS, so install GRASS separately and see GRASS not found on macOS. On macOS you can also install QGIS with GRASS support from MacPorts, as described in the QGIS installation guide.
Run a GRASS tool
The GRASS tools are in the Processing Toolbox (Processing ‣ Toolbox), under GRASS.
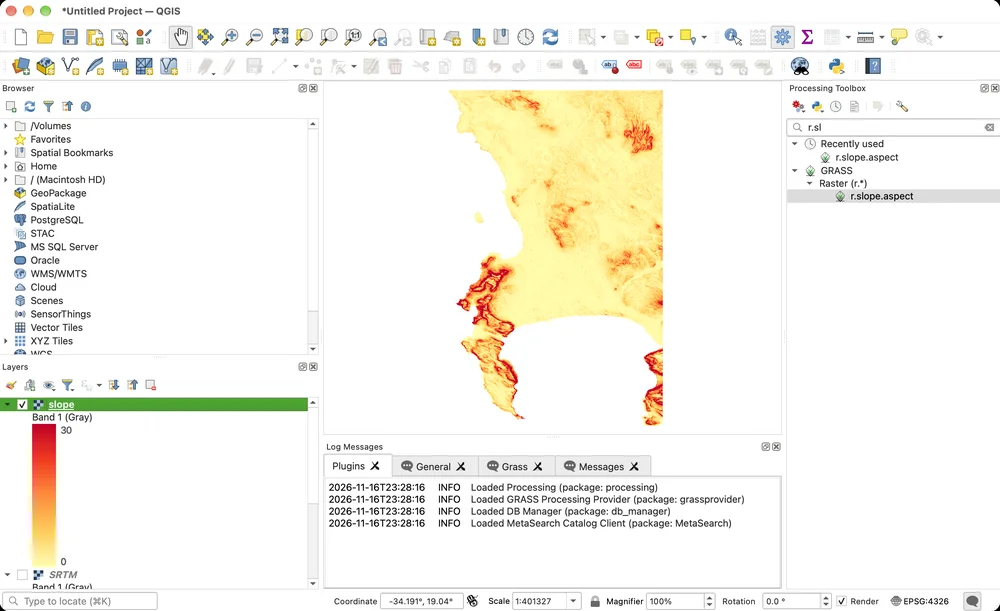
This example computes slope from SRTM.tif, the elevation model around Cape Town from the QGIS training data. Download SRTM.tif and add it with Layer ‣ Add Layer ‣ Add Raster Layer….
Search for r.slope.aspect in the Processing Toolbox and open it. Choose SRTM as Elevation. Leave Multiplicative factor to convert elevation units to meters at 1.0, because the elevation is in meters.
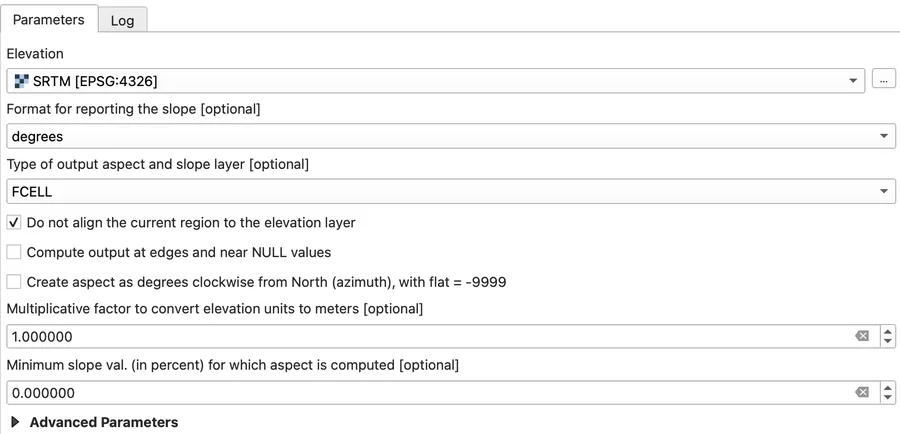
The tool has nine outputs, and by default QGIS computes all of them and adds each one to the map. To get only the slope:
- Next to Slope, click … and choose Save to File…. Pick the file with the dialog. A path typed by hand with
~fails, because QGIS passes it to GRASS as it is. - For each of the other outputs, click … and choose Skip Output. QGIS then leaves them out of the GRASS command, so GRASS does not compute them at all.
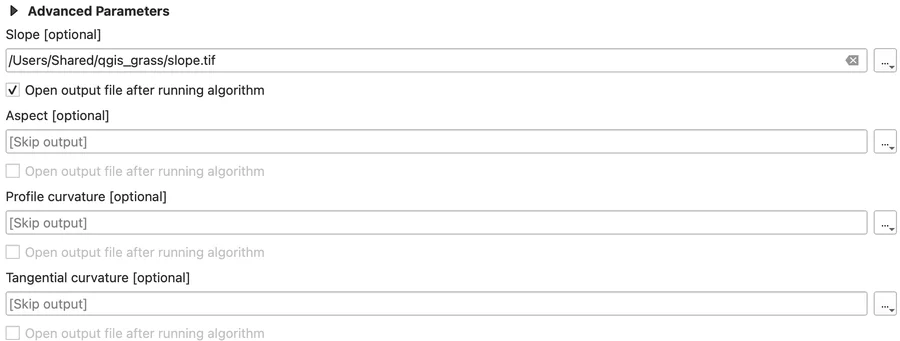
Click Run. If you run the tool again, check Elevation first: after a run, QGIS may select the new slope layer there.
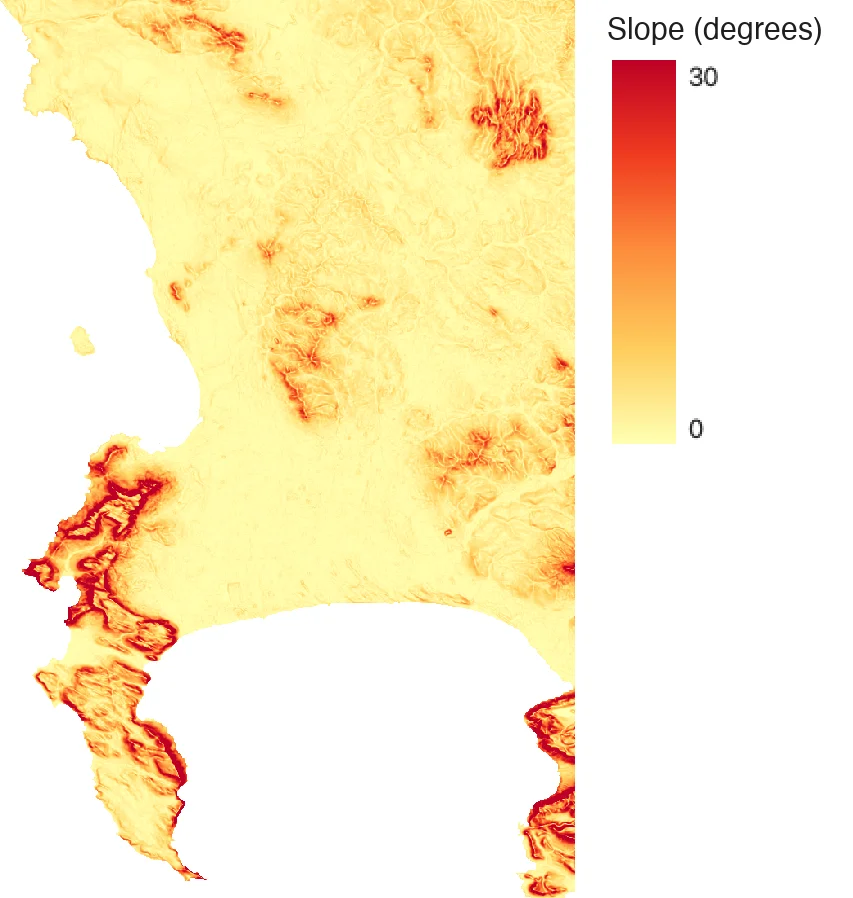
Most of this area is gentle, so a color ramp from 0 to 30 degrees shows it better than one up to the steepest cell. For the map below, open the layer’s Properties ‣ Symbology, choose Singleband pseudocolor, set Min to 0 and Max to 30, and pick the YlOrRd color ramp.
What QGIS does behind the scenes
The Log tab of the dialog shows the GRASS commands QGIS runs. QGIS creates a temporary GRASS project in the CRS of the layer and gives the maps temporary names. Then it imports the layer, sets the computational region to its extent and resolution, runs the tool and exports the output:
r.in.gdal input="/Users/Shared/qgis_grass/SRTM.tif" band=1 output="rast_6afb8857b82624" --overwrite -o
g.region n=-33.454002103 s=-34.374687925 e=18.872219805 w=18.269894211 res=0.0008330921078838172
r.slope.aspect elevation=rast_6afb8857b82624 format="degrees" precision="FCELL" -a zscale=1 min_slope=0 slope=slopeec7496369fc14332a68c5751f610f9c6 --overwrite
g.region raster=slopeec7496369fc14332a68c5751f610f9c6
r.out.gdal -t -m input="slopeec7496369fc14332a68c5751f610f9c6" output="/Users/Shared/qgis_grass/slope.tif" format="GTiff" createopt="TFW=YES,COMPRESS=LZW" --overwrite
The red ERROR 6 line about SetColorTable() in the log is harmless: the file is still written.
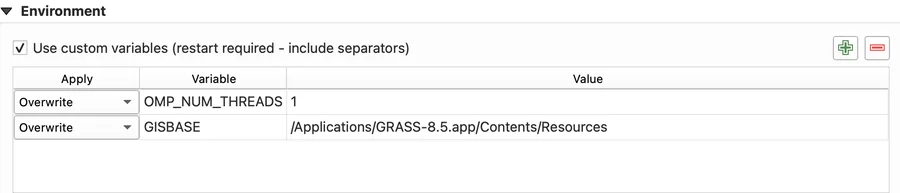
QGIS runs GRASS tools with their default number of threads. To set it yourself, add an OMP_NUM_THREADS variable, for example 1, under Settings ‣ Options… ‣ System ‣ Environment (see below) and restart QGIS.
Not every GRASS tool is in QGIS
The toolbox has most GRASS raster, vector and imagery tools. It has no temporal (t.*), 3D raster (r3.*), database (db.*) or display (d.*) tools. GRASS addons you install do not show up either, because QGIS only lists tools it has a description file for. For those, use GRASS itself, for example with the Get started with GRASS GUI tutorial.
The QGIS training manual has a GRASS module with more examples of GRASS tools in QGIS.
Troubleshooting
GRASS not found on macOS
If the QGIS app for macOS does not find a separately installed GRASS, the GRASS tools are missing from the Processing Toolbox, or opening one shows “Could not locate GRASS folder. Please make sure that GRASS is correctly installed before running GRASS algorithms.”
Tell QGIS where GRASS is with the GISBASE variable:
- Open Settings ‣ Options… and go to the System tab.
- Under Environment, check Use custom variables.
- Click the green + and set Apply to
Overwrite, Variable toGISBASEand Value to theContents/Resourcesfolder of your GRASS app, for example/Applications/GRASS-8.5.app/Contents/Resources. - Click OK, then quit and reopen QGIS.
Tested on macOS with QGIS 3.44.15, QGIS 4.2.3 and GRASS 8.5.0. Not tested on Windows or Linux.